Sometimes you capture a perfect shot, but the photo looks yellowish. Have you ever thought, “Why does this white object look yellow?” To fix that, you have to understand white balance in Photography.
When the white balance isn’t okay, the original color of the object won’t be expressed properly.
You can get the Deep Etch to fix the unsuitable background of your images.
But if the white balance isn’t right, it will be very difficult to fix that in the post-processing steps. Proper white balance is needed for all types of professional photography. It makes a huge difference.
What is White Balance in Photography?
White balance is how your camera expresses colors under different light conditions. It adjusts the photo so that white objects look white. Wrong adjustments of white balance don’t express the true color of the object.
You have to adjust the white balance based on the light conditions. When you set the white balance properly, your camera showcases the actual color temperature of the light source. So, the colors in your photo look natural.
Why is White Balance Important in Photography?
Color accuracy is the first thing that builds trust. If you’re a professional Aussie photographer, your clients expect to get the exact color in the photo. A white balance error makes a pure white t-shirt look beige. Sometimes a silver product appears dull.
It is also important in fashion photography. White balance sets the vibe of the image. Warmer tones give a cozy vibe. On the other hand, cooler tones give a modern look.
To make your images authentic, you have to ensure those things. It will make your brand consistent across different platforms.
White Balance in Product Photography
In eCommerce, colour accuracy is the most important factor. Online buyers depend on product photos to decide what to buy. If the product looks different from the image, they will return the product. Also, it damages their trust. It will have a bad impact on your brand value.
For example, your product photo shows a light grey hoodie. A customer ordered the image and found that the hoodie has a charcoal color. He will return the product immediately.
Through Deep Etch Australia, you can control the background. For color accuracy, you have to focus on the white balance in Product Photography.
Automatic vs Manual White Balance
Most digital cameras have the Auto White Balance (AWB) feature. Smartphone cameras also have the feature. In normal light conditions, it can provide actual color. The color won’t be accurate when you capture with an artificial light source.
In that case, you have to use the manual White Balance. In manual mode, you get full control of the white balance. Professional photographers use it for studio product photography. For professional work, manual adjustment is the best solution.
How to Adjust White Balance?
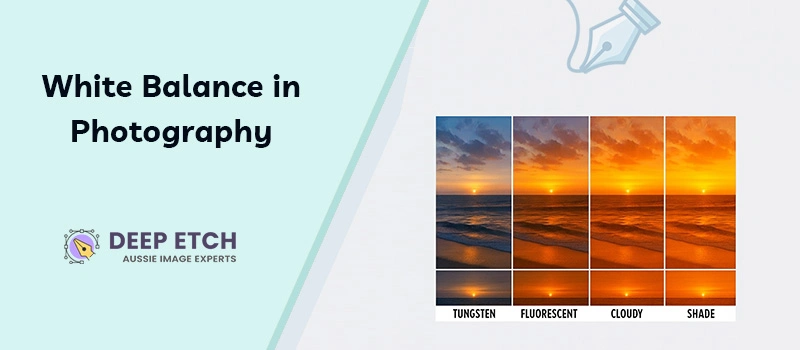
- Go to the Camera Settings. You will find different types of preset options. There will be Daylight, Cloudy, Fluorescent, and Tungsten effects based on your light source.
- You can use a Grey Card. You have to place a grey card in front of your subject. Then, set your camera’s white balance using that frame. It helps to neutralize tones in your final shot.
- The last option is to fix it in Post-Processing. If you shoot in RAW, you can adjust white balance later in Photoshop and Lightroom. Use the White Balance Tool to bring the natural color.
Creative Uses of White Balance
White balance isn’t only about correction. In professional photography, you can use it as a creative tool. Adjusting the warm tones around 3000K, you can manually create a golden-hour look.
Cool tones around 7000K give a modern vibe. Professional photographers adjust white balance intentionally to create a specific mood.
5 Common Mistakes to Avoid
- Relying only on Auto White Balance.
- Ignoring mixed light sources
- Forgetting to reset after changing environments.
- Not shooting in RAW.
- Skipping post-processing corrections.
Sum Up
White balance can transform the overall vibe of your photos. It’s the secret to keeping colors authentic. You should not rely on Auto White Balance for all objects. Start practicing to capture using manual white balance adjustment.
Do you want your product photos to stand out with true colors? Aussie Image Experts of Deep Etch are ready to help you with any post-processing requirements. Your images will be professionally balanced.
FAQ’s
What is the best white balance setting for product photography?
For product photography, it’s best to set white balance manually. You can use a grey card under your studio lights. If your product has a warm color, you can choose the Tungsten bulbs preset.
Can I fix white balance after taking the photo?
If you shoot in RAW format, you can fix white balance after taking the photo. You have to use Photoshop and Lightroom for the best adjustments. In JPEG format, there are some limitations.
What is the difference between color temperature and white balance?
Color temperature indicates the tone of light in Kelvin (K). White balance is the camera’s adjustment to that light to make colors look natural.
How do professional photographers get perfect white balance?
Most professional photographers use a grey card to get the perfect white balance. They shoot in RAW. Before delivering the project, manually adjust the white balance for the best adjustments.